We all understand the basics of shading, don't we? You mark on your drawing, where the shadows go. The darker places on the body of your figure.
Shading gives depth and form to your drawings, it pulls from the page a solid form. 2D drawings are banished.
So shading, if you want your drawing to be realistic or enjoyable, is one of the most important aspects of drawing. If this is true, then why are so many people afraid of it?
I recently stayed in a youth hostel with a painted mural up the walls of the stairwell. One of the paintings was of a winged man, nude, save for the cloth draped perilously across his lap.
I walked past it and thought, this person is quite good at drawing anatomy. So why is it that this painting is not amazing? Why is it that this is only an adequate to average painting?
I found the answer to my musings the second time I walked past. The drawing had very limited shading. Sure, you could tell one ab on his chiseled stomach from next, you could see where his arm differed from his body, but apart from that, there was no real shadow.
And because the shadow was lacking, and you couldn't see a definitive light source, the figure failed to 'pop'.
I understand the artists reluctance to draw shadow. I once, and occasionally still do, have the same problem.
When drawing the colours of something you become somewhat afraid of adding darkness. You fear getting the colour wrong. Or maybe you feel that you will get it in the wrong place and the image will be ruined.
You may be right. If you have very limited practice with drawing dark, dramatic shadows, you may well destroy your drawing. But like all aspects of art, it will undoubtedly improve with practice.
Like always, draw from life or photo's first, then when you feel more comfortable, move on to shading dramatic shadows on work's from your imagination.
I recently saw a painting of two elephants. One side of there body bathed in harsh African sunlight, the other cast in deep bulky shadows. It struck me as one of the most enjoyable images I have ever looked at.
I could not see what was hidden in the shadows, but I could guess. And sometimes leaving that little bit of mystery is all your dull drawing needs to be transformed into a work of art.
meg
Thursday, April 22, 2010
Tuesday, March 30, 2010
How To Draw A Male Face; Three Quarter View
Hi guys, I'm back with a new tutorial on how to draw faces. This one is of a male, at a three quarter view. As you may have read in previous posts, I consider this view to be the hardest to draw successfully.
This is not going to be detailed in features as I have already gone over them all in the shapes in this drawing. If he were smiling for instance, I would give you a smiling tutorial to go with it.
Right, here goes!
Step one:
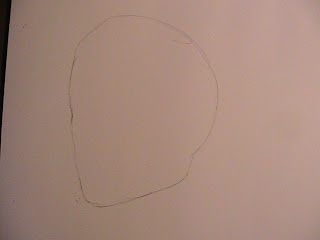
Draw the outline of the face. If you feel more comfortable, do it as I have. If not, feel free to break it up into steps. One step could be a large circle. This will represent his skull. Then you can add on the jaw in a similar shape as mine.
When you feel that this looks OK then we can move on to step two. Don't worry to much though. If, when you start adding features, you feel that the outline starts to look wrong you can change it when ever you want.
Step two:

I have added a line down the middle of the face. Just like in the front facing tutorial, except now the line is more to the left.
After you have done this, add a second line across the face at eye level. Remember from tutorial one, that the eyes are half way down the face.
Again, use the mid line as a reference and put in some smaller line to remind you where the mouth and the bottom of the nose should be.
Step three:

A nose. It is fairly simple so I haven't taken a close up picture, however, to explain; draw a fairly straight line from the middle of the eyes to three quarters down the face. End the line in a curve and to the right of it, draw a small curve for the nostril. Beside the nostril is another curve that indicates the wing of the nose.
Step four:

In this step I have done two things. One; I added a mouth. It is curving slightly in a smile. Draw another line to indicate the start of the shadow under the lip, and another dash for the top lip.
Two; I became unsatisfied with the chin and made it bigger. I will continue to make corrections to the chin through out the drawing process. Feel free to do the same thing yourself.
Step five:

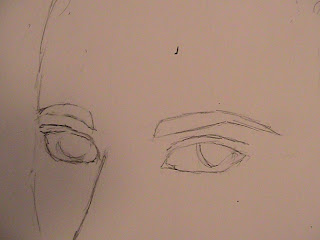
This character is looking at the us, so his irises are not in the middle of his eye. This is a good time to practice the trick about the eye lid. The upper curve of the lid is always above the iris. Even if the iris is not facing forward.
Also remember in this position the far eye is foreshortened. I forgot this in this stage, but you will notice that in step ten it is corrected.
Step six:

Eyebrows make him look more masculine, especially when said eyebrows follow these three criteria.
Step seven:

I have added and ear. Notice it's shape, try to copy. I have not published and ear tutorial because they are all to easy to hide with hair. However they are fairly simple to draw and you shouldn't find it to difficult.
Step eight:

In this I have added a hair line. Notice how suddenly his face has shape, and his head doesn't look so odd. If you have difficulty with finding the right place to put you hair line just look around you. Look at your friends heads, look at your own.
Adding the back of his neck also helps to give his head shape. Make sure you draw it behind his jaw, not coming out of it.
Step nine:

OK, so now I've given him some hair. I haven't drawn every strand, that is impossible. I have however, given him a general shape of how his hair is going to look.
Step ten:
Alright, now comes the fun part. Eyes breath life into your drawing. They give personality to an otherwise dull picture. I have added some more shape to his eyes, along with the tear duct in the inside corner. I have also drawn a upper lid.
Step eleven:

Oh my gosh! He looks like a girl! Don't worry, boys have eyelashes too. It will all work out in the end.
When drawing eyelashes, always start from the bottom of the top lid and curve up. As you move across the lid the lash will turn so it faces the viewer more. Don't be afraid to do this.
Step twelve:

Doesn't look so girly now, does he! Maybe just a little girly. But anyway, when drawing the inside of the irises make sure you leave a highlight. It needn't be big, but make sure you do. It makes the eye look wetter.
Also, just while we are on the topic, make sure you give shadow to your eyes. Just because the white is called white, doesn't mean it is. There can be shadow on the eye too.
Step thirteen:

Give the lips shape by shading.
Note the shape of the shadow under the bottom lip. It is in a sort of semi-circle shape.
Step fourteen:

Here is our character with shaded mouth as well as coloured brows. The mouth looks odd when it is the only thing shaded. That's why I recommend that unless you are planning to shade the whole piece, then leave the lips as line work, as in step nine.
Make sure his eyebrows mach his hair colour with in a few shades. Most peoples eyebrows and lashes are a few shades darker that their hair colour.
Step fifteen:

There, all done. Shading and hair colour done. Enjoy. If you have any further problems, please contact me at:
simpleartlessons@gmail.com
or leave a comment.
Until next time,
cheers guys,
meg
This is not going to be detailed in features as I have already gone over them all in the shapes in this drawing. If he were smiling for instance, I would give you a smiling tutorial to go with it.
Right, here goes!
Step one:

Draw the outline of the face. If you feel more comfortable, do it as I have. If not, feel free to break it up into steps. One step could be a large circle. This will represent his skull. Then you can add on the jaw in a similar shape as mine.
When you feel that this looks OK then we can move on to step two. Don't worry to much though. If, when you start adding features, you feel that the outline starts to look wrong you can change it when ever you want.
Step two:

I have added a line down the middle of the face. Just like in the front facing tutorial, except now the line is more to the left.
After you have done this, add a second line across the face at eye level. Remember from tutorial one, that the eyes are half way down the face.
Again, use the mid line as a reference and put in some smaller line to remind you where the mouth and the bottom of the nose should be.
Step three:

A nose. It is fairly simple so I haven't taken a close up picture, however, to explain; draw a fairly straight line from the middle of the eyes to three quarters down the face. End the line in a curve and to the right of it, draw a small curve for the nostril. Beside the nostril is another curve that indicates the wing of the nose.
Step four:

In this step I have done two things. One; I added a mouth. It is curving slightly in a smile. Draw another line to indicate the start of the shadow under the lip, and another dash for the top lip.
Two; I became unsatisfied with the chin and made it bigger. I will continue to make corrections to the chin through out the drawing process. Feel free to do the same thing yourself.
Step five:

This character is looking at the us, so his irises are not in the middle of his eye. This is a good time to practice the trick about the eye lid. The upper curve of the lid is always above the iris. Even if the iris is not facing forward.
Also remember in this position the far eye is foreshortened. I forgot this in this stage, but you will notice that in step ten it is corrected.
Step six:

Eyebrows make him look more masculine, especially when said eyebrows follow these three criteria.
- Thick
- Lower over his eyes than female eyebrows.
- Less of a gentle curve and more of a 'joint' before the eyebrow slopes down.
Step seven:

I have added and ear. Notice it's shape, try to copy. I have not published and ear tutorial because they are all to easy to hide with hair. However they are fairly simple to draw and you shouldn't find it to difficult.
Step eight:

In this I have added a hair line. Notice how suddenly his face has shape, and his head doesn't look so odd. If you have difficulty with finding the right place to put you hair line just look around you. Look at your friends heads, look at your own.
Adding the back of his neck also helps to give his head shape. Make sure you draw it behind his jaw, not coming out of it.
Step nine:

OK, so now I've given him some hair. I haven't drawn every strand, that is impossible. I have however, given him a general shape of how his hair is going to look.
Step ten:

Alright, now comes the fun part. Eyes breath life into your drawing. They give personality to an otherwise dull picture. I have added some more shape to his eyes, along with the tear duct in the inside corner. I have also drawn a upper lid.
Step eleven:

Oh my gosh! He looks like a girl! Don't worry, boys have eyelashes too. It will all work out in the end.
When drawing eyelashes, always start from the bottom of the top lid and curve up. As you move across the lid the lash will turn so it faces the viewer more. Don't be afraid to do this.
Step twelve:

Doesn't look so girly now, does he! Maybe just a little girly. But anyway, when drawing the inside of the irises make sure you leave a highlight. It needn't be big, but make sure you do. It makes the eye look wetter.
Also, just while we are on the topic, make sure you give shadow to your eyes. Just because the white is called white, doesn't mean it is. There can be shadow on the eye too.
Step thirteen:

Give the lips shape by shading.
Note the shape of the shadow under the bottom lip. It is in a sort of semi-circle shape.
Step fourteen:

Here is our character with shaded mouth as well as coloured brows. The mouth looks odd when it is the only thing shaded. That's why I recommend that unless you are planning to shade the whole piece, then leave the lips as line work, as in step nine.
Make sure his eyebrows mach his hair colour with in a few shades. Most peoples eyebrows and lashes are a few shades darker that their hair colour.
Step fifteen:

There, all done. Shading and hair colour done. Enjoy. If you have any further problems, please contact me at:
simpleartlessons@gmail.com
or leave a comment.
Until next time,
cheers guys,
meg
Saturday, March 27, 2010
How to Draw a Simple Female Face in 7 Easy Steps
Hi again, glad to see you're back reading my newest article. Well in this case, watching is the more appropriate verb.
Hope you enjoy this little tutorial, I enjoyed making it for you.
This is nothing to fancy, but bare with me, heaps more coming soon.
Hope you enjoy this little tutorial, I enjoyed making it for you.
This is nothing to fancy, but bare with me, heaps more coming soon.
How To Draw Eyes
Hi again. This tutorial I will take you through a basic eye drawing introduction. Again we will view three different positions, front, side, and the three quarter view.
Enjoy!
Step one. Here is a starting point for a front on eye. This is just like your childhood drawing style. The eye starts as a pointedoval.

The top of the oval is more rounded than the bottom, and as a general rule, the most curved bit is directly over the iris.

The next step is to add the iris, and the lids. Eye lids have a certain thickness, just like every other bit of skin.
The top lid will look thicker because when the eye is open it bunches up.

Next step is to add the details. Eyelashes of course (even boys have them). And the colour of the ires. Notice that I have left a lighter highlight over the middle of the eye. You can put this highlight where ever you want, and a good way to do it is to erase where you want it.
Here is another view of the eye. This tutorial can be adapted to draw the side or the three quarter view. I will draw the three quarter view as it is the hardest.

The eye now looks like a triangle... sorta, maybe squint and it will... anyway, moving on. It helps me, if I am starting the face with the eye, to draw a line from the eye. This line will be replaced latter with the side of the face, so don'tworry to much if it looks wrong. Do however make sure that your eye lids look good, they are important.

OK, now add the eyelashes. If you want to frame the eye, and put it into context, you can draw a eyebrow as well.

Draw the lids line above the eyelashes. Don't be scared to add light lines under the eye. But only do this in an extreme close up, as it will make your character look old and tired other wise.
If you want to draw a side on eye, you could stop here, however if you want to draw a three quarter then read on.

There you go. Finished. All I have changed is the line of the face. If you look closely you can see where I have erased them. I have added the outside of the eye, and altered the lids to work with the change in perspective.
So, again, if you need more help, or would particularly like to see another tutorial like this, perhaps of closed eyes, or open mouths, email orcomment. My email is simpleartlessons@gmail.com.
Cheers guys,
meg
How To Draw A Mouth
Hi guys, this is our second article in the details of the face series. And as you probably have noticed it is going to hopefully give you a basic idea on how to draw a mouth.
When drawing a mouth always start with a line, if the mouth is closed. We will unfortunately not be covering open mouth today, however, I will definitely go through it at a latter date.
Here is the basic start to any forward facing mouth.

Yep... It's a line. Fun huh?
On to the line, we are not going to draw the outline of the lips unless your character is wearing lipstick. Instead build up the shadows through shading and then add colour latter.

Tada! A mouth with only shading. Now I will take you through a side on mouth. In this one I will add an extra step showing addition of 'colour' (not actually colour as I am using pencil).

Notice how the top lip juts out further than the bottom one, and has a sharper curve to it. Make sure you show the concave curve under the lips. This is how the chin starts. Again, to show shape add shading.

The light if from above, will shadow the under-curve of the top lip, and in the process the very top of the bottom lip. The bottom lip shadows the top of the chin.

In this photo, I have added colour. Notice that the colour doesn't cover up the shading, it intensifies it. To do this simply make your shadows darker where ever there is colour.
The final of my lip tutorial will be a three quarter view of a mouth. This, like the nose, is for some, the most difficult position.

However, if you look closely at my drawing you will notice that there is a simple way to make it look realistic.
Just make the side further away from you have a sharper slope. In other words, one side of the mouth is longer that the other. But. Make sure that the line you start with is level. Don't make either side of the mouth higher or lower.
So, again, we have finished a basic feature tutorial. Looking forward to meeting you again when the tutorial on eyes is up.
Cheers guys,
meg
How To Draw A Nose
How does one go about this? It sometimes seems like a insurmountable task. However, if you break down a nose in to it's most basic shapes, you will find that a impossible problem suddenly becomes as easy as one, two, three.
The first problem many people have with noses is that they find that however hard they try, the nose continues to look as if a 5 year old has drawn it.
Fortunately this is easily fixed. All you need to do is look at some real noses. I will help by showing you some noses that I have drawn from images and life.
The first nose is facing us. This is something many people have difficulties with because of there childhood nose drawing style.

As you see, the nose can be broken up into basic shapes, just as anything else can. At the moment it looks kind of like a lolly with a cone on it.
Remember where these basic shapes are then begin shading.

I have erased the majority of the shape outlines, and replaced them with shading on the side away from the light source.
To finish your nose, and really make it pop out of the picture darken the shading in specific areas.

Under the nose and on the right side of the wall of the nose, are the places that have the deepest shadow. Of course this all depends on the light source. We will discus light sources in more depth next in another article.
So now that you have basic knowledge of the face on nose, lets move on to something that you may all find easier. The side on nose.
Here is a basic starting point.

You may find this similar to your childhood drawings, but we have some more detail to add.

Here I have added the nostril and the wing of the nose. The wing cuts into the line of the face slightly, so when you draw it, make sure that your nose is not floating on top of the face, but looks as though it is firmly attached.
The last image I am going to show you is a three quarter nose. This is definitely the hardest and even I sometimes have difficulty drawing it with out reference. So I don't want you to expect to get this one straight away. In fact, you will probably need to draw from reference until you get it.

It helped me to show the angle by drawing a sketchy face around this nose. Often when drawing it, it will initially look to big. But persevere and when you finish the rest of the face it will often fit.
So that's all for now on noses. If you need anymore help, feel free to contact me at either my email address, simpleartlessons@gmail.com or by leaving a comment.
Looking forward to our next article together,
cheers guys,
meg
Monday, March 22, 2010
How To Draw From Your Imagination
Alrighty then. Last blog, we talked about, structures under the skin. We decided, well I decided with absolutely no impute from you what so ever, that knowing what is going on under the skin is vastly important to any sort of animal or people drawings (And lets face it. I am not a landscape artist).
When you see people drawing, usually it is with out any sort of reference material to copy from. I may be wrong and you frequently see people drawing from life, but that is not the topic of this particular article.
These people may be great, or they may be crap (excuse the language). And because you are reading this, I'm going to assume you are one of the latter. No offence if you are not.
So you draw a person. It takes you absolutely ages. You either are never satisfied with it, or you think its brilliant... until you step back for a look.
The reason for this is that you probably have no idea how to draw a person. Half the time you are guessing, and the other time you are remembering.
If you are not a trained artist, chances are you are not great at drawing from memory. Don't get me wrong, some people can train them self to do this. But the point is that they are trained.
In fact, most of those people you see drawing perfect people with out reference are trained in one way or another.
I have trained my self. One of the people I know, went to art school. You, assuming you couldn't draw the person, are not trained.
Another word you can use for 'trained' in this context, is practiced. To draw that figure or dog or tree, from imagination or memory, you must be able to draw it from reference. That is you can pick up a picture in a magazine and copy it accurately.
Also you need to have picked ten or more (how ever many it takes), in countless positions, and have drawn them as well. And I don't mean, drawn ten, then thought 'well that looks crap, oh well, I can draw from imagination now.'
I mean you keep copying until you get it looking right. It may not be exactly the same. But nothing looks 'wrong'. So no eyes in the wrong shape. No fingers in the drawing that you can't see in the photo. if you are facing her nose, it is not drawn side on. And etc. I'm sure you can think of more.
After, or before this copying step, (Actually to be honest, before is better)you need to do some learning. You need to learn the skeletal and muscular skeleton of a human, or dog, or what ever you want to draw.
I don't mean that you need to know every single muscle, and every single bone, along with Latin names. I mean you need to be able to draw from memory a basic skeleton, and if you want to be able to draw muscle tone at some point, you need to know the basic muscle and how they change shape when the person moves in a certain way.
To be honest, if you look at this dog drawing,
 I was guessing at the muscles and I had limited practice with reference for the feet. I did have basic idea of where the muscles should be, to get the limbs to do what ever they were doing. But I hadn't referenced it or checked. I did have a firm knowledge of the skeleton.
I know that this all sounds like a lot of work. And, to get started, it is. However, it will not always be that way. I only need to do one or two reference drawings to be able to draw the same thing from memory or imagination.
You will also be pleased to know that once you understand the basic skeleton, you know it for every vertebrate on the face of this planet. Muscles are some what the same. For example, animals with four legs all have very similar muscle structures (not insects, they have exoskeletons, so you don't need to wory about muscles).
I learnt to draw horses. From there I found I could draw dragons. After that I tried my hand at dogs. If you know it, you got it.
If you put the effort in, honestly, it will help.
When you see people drawing, usually it is with out any sort of reference material to copy from. I may be wrong and you frequently see people drawing from life, but that is not the topic of this particular article.
These people may be great, or they may be crap (excuse the language). And because you are reading this, I'm going to assume you are one of the latter. No offence if you are not.
So you draw a person. It takes you absolutely ages. You either are never satisfied with it, or you think its brilliant... until you step back for a look.
The reason for this is that you probably have no idea how to draw a person. Half the time you are guessing, and the other time you are remembering.
If you are not a trained artist, chances are you are not great at drawing from memory. Don't get me wrong, some people can train them self to do this. But the point is that they are trained.
In fact, most of those people you see drawing perfect people with out reference are trained in one way or another.
I have trained my self. One of the people I know, went to art school. You, assuming you couldn't draw the person, are not trained.
Another word you can use for 'trained' in this context, is practiced. To draw that figure or dog or tree, from imagination or memory, you must be able to draw it from reference. That is you can pick up a picture in a magazine and copy it accurately.
Also you need to have picked ten or more (how ever many it takes), in countless positions, and have drawn them as well. And I don't mean, drawn ten, then thought 'well that looks crap, oh well, I can draw from imagination now.'
I mean you keep copying until you get it looking right. It may not be exactly the same. But nothing looks 'wrong'. So no eyes in the wrong shape. No fingers in the drawing that you can't see in the photo. if you are facing her nose, it is not drawn side on. And etc. I'm sure you can think of more.
After, or before this copying step, (Actually to be honest, before is better)you need to do some learning. You need to learn the skeletal and muscular skeleton of a human, or dog, or what ever you want to draw.
I don't mean that you need to know every single muscle, and every single bone, along with Latin names. I mean you need to be able to draw from memory a basic skeleton, and if you want to be able to draw muscle tone at some point, you need to know the basic muscle and how they change shape when the person moves in a certain way.
To be honest, if you look at this dog drawing,
I know that this all sounds like a lot of work. And, to get started, it is. However, it will not always be that way. I only need to do one or two reference drawings to be able to draw the same thing from memory or imagination.
You will also be pleased to know that once you understand the basic skeleton, you know it for every vertebrate on the face of this planet. Muscles are some what the same. For example, animals with four legs all have very similar muscle structures (not insects, they have exoskeletons, so you don't need to wory about muscles).
I learnt to draw horses. From there I found I could draw dragons. After that I tried my hand at dogs. If you know it, you got it.
If you put the effort in, honestly, it will help.
Subscribe to:
Posts (Atom)
