I have been getting requests to hurry up and make some tutorials already. So I did. Hope you guys like horses...
How to Draw a Simple Horse
Step 1:
All these steps are equally simple. Just because this is step one, does not mean that the other steps will be harder. The only skills this tutorial needs is patience and a pencil.
If your circles don't turn out the way mine did, don't worry. This bit of the tutorial is aloud to be rough. Just continue to draw circles quickly on your page. Eventually the mass of circles will add up to look right.
Keeping in mind what the circles and lines in this tutorial represent is good practice. Many tutorials don't tell you to do this, but I believe that it is very important. Remember that the circles and lines of the first four steps are just representations of the horses body. In the final step you can discard a piece completely if it doesn't fit into how you think the outline of your horse should look.
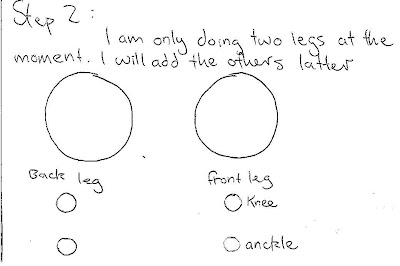
Step 2:
A good technique at this point is to visualise the out line of your finished horse over the circles you have drawn. This way you don't need to worry about putting a circle in the wrong place.
Many people, myself included, when copying a step by step tutorial like this one, feel that they need to place the circles in the exact same position as the tutorial artist has placed theirs.
In my opinion that is not drawing, it is tracing. You will get much more satisfaction if you visulise the finished
horse and put the circles inside the visualisation. This way you are least likely to have to change the positions of circles before the final step.
Step 3:
 Remember, the key to getting the head in the right position is to visualise a horse over the circles.
 Sometimes it helps to have a picture of a horse that you can refer to.
Step 4:
 At this point if you don't already have a picture of a horse for reference, it is time to go find one. Google images is great for this, as long as you don't break copyright on anyone's photos.
Notice that I haven't stuck directly to the circles. They are just a general guide line to where the horse is.
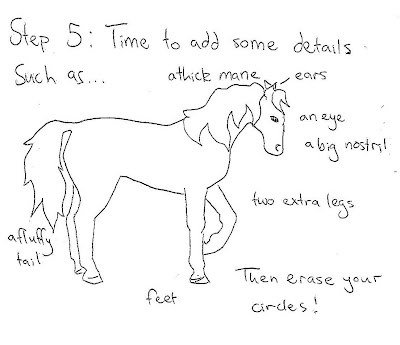
Step 5:
 Excuse my rushed drawings. However this tutorial, I hope, will give you a rough idea on how to draw a horse. The circles can be manipulated to put your horse in different positions. However because the horse is drawn side on, it can be difficult for a beginner to change the view point to, say, a horse facing us. Let me know if you would like to see any tutorials on horses in different positions and I will see what I can do. :)
If you are having difficulty drawing the details from my drawing, never fear, another tutorial on details will be on the website soon.
Thanks for viewing guys!
I hope you can now draw a horse like this one.
Cheers
Meg


No comments:
Post a Comment